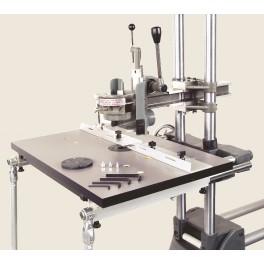
Shopsmith Overarm Pin Router
Make Your Hand-Held Router One of the Most Versatile Tools In Your Shop
NOW DISCONTINUED original item was on a stand with a single pole
Item pictured is the last version connecting direct to the Shopsmith

Just mount the overarm and router table directly to your Mark 7 or Mark V's twin way tubes and worktable and in minutes, you'll be performing many operations faster and with far greater precision and repeatability than you could ever hope to achieve with conventional routing methods.

You'll Do All This With Your Overarm Router:
- Form decorative edges and surface designs on straight or curved stock
- Cut precision dadoes, rabbets, sliding dovetails, drop-leaves and similar joints
- Repair furniture and veneers
- Joint workpiece edges for glue-ups
- "Saw" straight and irregular shapes
- "Drill" round or oddly-shaped holes
- Pin rout exact duplicate workpieces
And, since it operates with the bit cutting down from above the workpiece, you'll have a clear, safe view of your work at all times... and be able to make depth-of-cut adjustments with a simple drill press-like quill lever.
So... What Exactly is Pin Routing?

It's a simple operation that uses a shop-built guiding fixture to make exact duplicates of workpieces, just like they've done in cabinet shops and furniture factories for years.
Here's How the Pin Routing Process Works:
- A particleboard or MDF ficture is made by cutting grooves in one side, matching the shape of the pieces you want to make
- A straight bit is inserted into the router motor (mounted in the overarm)
- A tracing pin (same size as the groove in your fixture - and your bit) is inserted into the table plate. The pin and bit are then aligned perfectly with one another
- A workpiece is temporarily screwed to (or clamped into) the opposite side of the grooved fixture
- The fixture is then flipped over (with the workpiece attached) and its groove dropped over the tracing pin
- The router motor is turned on and the bit lowered into the stock. The groove is traced over the pin, creating a workpiece that matches the size and shape of the groove in your fixture, perfectly
- The workpiece is removed and replaced with a new blank... then the process is repeated, if desired
- Once you've made a fixture, cut out as many parts as you like, then set it aside until the next time you want to make more of the same item
Feature-Packed for Top Performance
Your Overarm Pin Router is loaded with features and capabilities that will help you turn out better projects every time.
- The rigid, cast aluminum arm will not flex druing operation
- A large worktable with a friction-free, laminated-covered surface delivers smooth operation and optimal support
- Precision, rack-and-pinion quill feed mechanism makes minute adjustments a snap
- Shatterproof, see-through safety guard keeps your fingers out of harm's way
- Built-in dust chute catches debris at its source
- Comprehensive owner's manual guides you through set-up and all operations
| Specifications |
|---|
| Maximum router motor HP | 3 hp |
| Router motor diameters accepted* | 2-1/2" to 4" |
| Throat depth (bit center to way tubes)** | 10-1/2" to 18-1/2"*** |
| Vertical motor travel (lever-controlled) | 3-1/2" |
| Maximum workpiece thickness | Approx. 11"**** |
| Fence size (2) | 13-1/4" w x 1-1/4" h |
| Worktable size (laminate-covered MDF) | 18-1/2" d x 28" w x 3/4" h |
| Guide / Starter pin diameters furnished | 1/4", 3/8" and 1/2" |
| Maximum bit diameter (with insert) | 1-3/8" |
| Maximum bit diameter (without insert) | 2" |
| Dust port diameter | 2-1/4" |
* Round motors only
** With 3-1/2" diameter router motor. Distances vary, depending on diameter of router motor
*** Maximum dimensions, depending on which set of arm mounting holes are used
**** Varies, based on router motor and bit used
Includes: Overarm • Mounting Clamps • Worktable • (2) Table Inserts (one for conventional routing and one for pin routin) • (3) Guide / Starter Pins • Two-Piece Fence with Mounting Knobs • Safety Shield • Dust Port • Mounting Hardware • and Manual.
Shopsmith Tools in Action - UTUBE Online Video
Watch These Online Videos Of This Amazing Tool
Overarm Router - Part 1 Introduction
Overarm Router - Part 2 Joinery
Overarm Router - Part 3 Decorative Shapes
Overarm Router - Part 4 Pin Routing
Overarm Router - Part 5 Routing Round Stock
Mortising on the Router Arm
Avoiding Back-Routing
 Maximize


