504273 Shopsmith Mark V Extention Table legs
Use this item to make your own DIY router table
A Full-Featured Router Table Maximizes Your Shop Space
Just drop the twin mounting-tubes into the extension table mounts on your Mark V, add your own router table, install and adjust your telescoping legs on the opposite side and you have the foundation for a great router table.
This space-saving device then mounts directly on your Mark V to provide routing capabilities taking up minimal space.
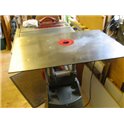
I connected my Veritas router table to my own Shopsmith
It is a simple item to do, you just have to make sure that the centre hole for the router to poke through is offset from the end of the Shopsmith. Nearly all tables are useable and most have the centre hole for the router offset to one edge. For me using the Veritas table the biggest problem was putting the countersink in the steel table to make the bolt tops flush. On a standard Trend, Shopsmith (read Incra) or similar top you are working with 5/8" or 3/4" MDF tops so there is more meat to play with. Plus with threaded bolts you wouldn't have to disturb the top surface.
Instead of trying the complicated route of altering my worktable I purchased a spare set of legs (item 504273) and used them by attaching them to my Veritas steel plate router table. the table (like nearly all models) has a long and short side offset. I affixed the legs on the short side making sure I had enough clearance on the end tailstock for the router to hang down. The only difficult part to the setup was drilling out the countersinks for the countersunk bolts as the table is a miserly 3/16ths thick. If you are using a Trend, Shopsmith, Incra or Rockwell router table they have a lot more meat to play with. I then purchased a Router Raizer to make the adjustments for height and a Eliminator chuck whie I was at it. I am pleased with the end result as it has given me a height adjustable router table and with the router taken off an extra platform at the right hand end of my Shopsmith. The Veritas table is is extremely sturdy being steel. I now have a lift on and off item which fits in nicely with all my other accessories.
For storage I made up two slides under my storage worktable and it just slides in out of the way when not needed. The pictures are pretty self explanatory and I hope the idea is useful to some of you.
The picture and description below is of the Shopsmith 555658 table.
A DIY version of this can be achieved with the extention support legs as a start

The 23-3/4-inch x 18-inch laminate-covered table top features a drop-in center insert (with leveling shims), to which you attach your router motor's base. Its inlaid aluminum T-slot miter gauge channel will accept the Mark V miter gauge or featherboards and can be easily adjusted for a snug fit.
A series of threaded inserts in the table's surface accept the independently adjustable two-piece fence which can be locked into position with comfortable 3-wing knobs. Travel slots in the fence faces allow the attachment of shop-made faces.
The large table surface also makes an excellent auxilliary support table for other Mark V operations. It can also be mounted on the Power Station.
Note: The Mark V Router Table requires a separate router motor. The router motor must not exceed 3 hp. The router base must be round and not exceed 6-1/2-inches in diameter.


 Maximize